Click on HOME to see most recent posts!

Place a Stampin' Up order with me and get a
FREE TUTORIAL OF YOUR CHOICE for every $50 that you spend!

Saturday, October 30, 2010

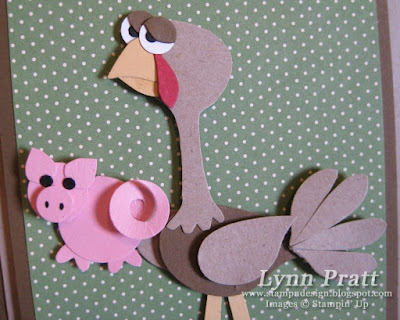
The Other White Meat

I love this card and I think it is hysterical! Do you get it? The turkey is saying to not eat him for Thanksgiving and to eat the cute pig instead.
"If you are what you eat, eat something cute!" On the inside it says Happy Thanksgiving.

So this card is half punch art and then just some cut shapes since I didn't have any
punches that gave me the head and feet shapes I wanted.
The paper is Woodland Walk DSP and the stamp is from the Birthday Bakery stamp set.

Here is how I did it:
The body of the turkey is the bird punch out of Soft Suede card stock. Then I just trimmed the head off.


The wings are the bird punch wings but the head is cut freehand with a scissors out of Crumb Cake card stock.


The beak is from two bird wings overlapped and trimmed off.


The gobble is Red Riding Hood paper cut out with the leaf from the branch on the bird punch. The eyes are using the medium and small circles from the Owl Punch.


The pig is Pretty in pink card stock. The body is the 3/4" circle punch and head is the 1/2" circle punch. The ears are the middle circle from the owl punch trimmed a little and feet are the heart from the owl punch. The tail is a spiral cut out of the big circle on the owl punch and nose and eyes are the two smaller ones. The tail of the turkey is the wing from the bird punch cut in half with the ends rounded. I used two of them to get all four feathers.
Hope you think my card is as funny as I do! Ashley did not think it was funny and did not want anybody to eat the cute little pig!

Friday, October 29, 2010

Three Pumpkin Snowman Tutorial!

As promised, here is the snowman tutorial!

CLICK HERE to see the original pumpkins where I got this idea from.

There are three sections and here is what you need for them:
small - (11) - 4" x 3/4" strips
medium - (14) - 6" x 3/4" strips
large - (21) - 8" x 3/4" strips

First you are going to take your small strips and punch a hole in both ends using the Crop-a-dile. I used a 15" piece of 1/4" white grosgrain ribbon, put a jumbo brad through one end and stuck it through the end hole in one side of the small strips. I then put the other end of the ribbon through the other side. Then I put the ribbon through the middle sized strips.
Tip: If you want each section to be a certain height you can tie a knot in the ribbon before you put it through the other end hole on the small strips. Then put one end of the medium strips on and tie another knot. This will keep them from sliding up and down on the ribbon. This step is not in my photos.


Put the largest strips on and then use another jumbo brad through the end of the ribbon after cutting it the right height for your snowman.


Now you can spread out the bottom and top strips to form the ball. I used black pipe cleaners and just bent the ends to look like fingers. I would suggest dividing the middle strips in half and putting the pipe cleaner on before you expand them.
Tip: Once I had all the sections on, before expanding them, I put a wooden skewer through the center holes to keep the snowman from being too floppy. Or else you just have to lean him against something when you display him.


The hat is a 2 1/2" circle and 1 3/4" punched circle. The center part is a 6" x 2" strip scored 3/8" in from both long sides and then those edges are cut into little tabs like shown below.


Using Tombow glue you can roll the center strip and glue it to the inside of the small circle.


Then put glue on the other tabs and stick it to the center of the larger circle. Then I used red grosgrain ribbon and snail adhesive to wrap around the base of the hat. I put this on the snowman with Dimensionals. I used more ribbon to tie around the neck for a matching scarf.


Hope you have fun with it!

Three Pumpkin Snowman

I made a previous post with a pumpkin made out of strips of paper. I decided to take it one step further and make a snowman out of three different sized pumpkins!
Check back soon for the tutorial!
CLICK HERE to see how I made the pumpkin.

Wednesday, October 27, 2010

Fall Pumpkin Swap

Stamping Demonstrators are the Best! Because of everything that has been going on with Ashley I was not able to attend my Addison stamping meeting that I go to every month even though I had already replied that I was coming and swapping. Something last minute had come up so I emailed to say I couldn't go. My wonderful upline, Jen Heffernan, collected all the swaps from the ladies for me and mailed them to me and I will give mine out at the next meeting! So even thought I couldn't go I am still able to share some of the swaps because of the wonderful ladies that are in this group!
This swap is by Heather Seeley

One of the swaps was this great pumpkin (above) which I just had to try right away! (My pumpkin is at the top of this post.) My version of it is using the Sweet and Sour Specialty Designer Series Paper and the Leaves#2 Die for the Big Shot. I used (14)- 3/4" x 6" strips of DSP to make this. I used the crop-a-dile to put holes in both ends and used a jumbo brad to hold it together.

First cut your 3/4" x 6" strips of DSP. Using the crop-a-dile punch holes in both ends of each strip. Use a jumbo brad and a piece of grosgrain ribbon through one hole. Then tie a knot about 2 1/2" down the ribbon.


Thread the ribbon through the other hole and then tie a knot on the outside also.


Spread out your strips to make the pumpkin and then add your leaves!


Thanks for sending the swaps Jen!
If you want to be a part of this wonderful group of ladies CLICK HERE for more details to join my team!

French Foliage Gift Card Holder


I finally took a minute to look on some other blogs and found a great blog by Tessa Wise. I saw these two cards, this one and this one and thought I would use elements from both to make my card. I loved the way she tied the end of the ribbon with the button on the first card and loved the mini (3"x3") envelope in the second one! I folded my envelope a little differently so I could fit a gift card in the pocket.


I used the Just Believe and French Foliage stamp sets to make this card. The leaves are stamped in Early Espresso on Very Vanilla card stock and then sponged with More mustard and Cajun Craze. I cut them out and then used Crystal Effects to go over them. The card size is 5 1/2" square and does not open, you just flip open the front tab (4" square) to get the gift card.
For the mini leaf I just stamped the leaf stamp again and then cut out the shape with scissors. I think the little guy is so cute!

I put a small piece of Cajun Craze card stock over the sticky part of the 3" x 3" envelope so it would not seal the top flap shut by accident.
I love this 1 1/4" Striped Grosgrain Ribbon and the new Deck the Halls buttons! Can you tell?!

Tuesday, October 26, 2010

French Foliage Flower


I liked my poinsettia flower so much I just had to try it with some other colors too!
Here it is in Daffodil Delight card stock for the flower with Whisper White craft ink on it. The background paper is So Saffron since the white ink lightened the Daffodil petals so much.


You can see how I made this flower HERE!

Monday, October 25, 2010

Ashley Update

I just wanted to let you know that so far together we have raised over $1,700.00 for the American Diabetes Association through your generous donations in Ashley's name. Thank you so much for all of your support! Don't forget to keep telling people about how to get the purse. We are going to keep raising money until they come up with a cure!
I hope you are all enjoying your purses! I would love to see some pictures of what you have done with them!
If you have no idea what I'm talking about CLICK HERE for all the details!

I am also happy to say that Ashley is doing better and better every day. She is getting great at doing her finger pricks and she is getting much better about the insulin shots. I am thankful to say that this disease has not dampened her cheerful disposition and wonderful outlook on everything that she does. She is truly a special little girl.
Thank you for all of your wonderful emails and donations. You are a spectacular group of people.
Related Posts with Thumbnails