Click on HOME to see most recent posts!

Place a Stampin' Up order with me and get a
FREE TUTORIAL OF YOUR CHOICE for every $50 that you spend!

Wednesday, December 8, 2010

Craft Project Central Blog!

I have been asked to be a Guest Designer on the Craft Project Central blog for the next few months! I did this Nutcracker punch art gift box for this month. You can check it out on their site!

Here are the latest projects that have been posted to the site this month.

Candy Cane Candle – Naoko – www.nstampage.com


Merry Crittermas Holiday Card Tin – Sonya – www.stampwithsonya.com


and the Jolly Holiday Christmas Organizer – Free Project – Jacque – www.stampinwithjacque.com

Gingerbread House Gift Box & Card


Here is my Gingerbread House Box & Gingerbread People Card Project! Doesn't this make you want to go find some cookies to eat?! The Gingerbread house box is the perfect way to give a gift for the holidays, and what better card to put with it then a Gingerbread man or woman!
You could also make this box into any other type of house for other occasions. It would be perfect for a spooky Halloween house or a cute doll house for a child or a regular house for a moving gift. Change the colors and decorations for any occasion!
The card is standard 5-1/2" x 4-1/4" and the box measures approximately 4" deep x 5-1/2" tall. You do not need 12"x12" paper for this project.

To see more details or purchase the tutorial
CLICK HERE!

Monday, December 6, 2010

Downhill for Diabetes Event

As most of you know Ashley was diagnosed with Type 1 Diabetes earlier this year. We have been struggling to get her sugar levels under control but Ashley has faced this disease with courage and a positive attitude. (Most of the time!)
For those of you that don't know, Brad (my husband) and I have recently started a non-profit organization, Donations for Diabetes, to help raise funds for diabetes research and find a cure for this disease.
We are holding a ski and snowboarding event called Downhill for Diabetes at Pico Mountain in Vermont on February 13th, 2011.
It is very similar to a donation walk, only Vermont style! I hope you will help us with this effort by participating in this great event and come ski or snowboard for the day!
If you do not ski or snowboard you can still participate in the event by donating money and getting free gifts and prizes!
If you raise $50, you get a half price lift ticket for the day and a Downhill for Diabetes fleece ear band! Raise more and you can be eligible for more great gifts and prizes! There will also be a donation race course set up that you can go through and get timed and prizes will be awarded for the fastest times of the day! You can participate in this event as a skier or a snowboarder. You can do it individually or form and team and come as a group!
I really hope that you will join us in our fight to cure this disease so Ashley and all the other people like her can lead normal healthy lives!

You can see more details and register on the website at:
http://www.donationsfordiabetes.org/

If you have a business and want to get some great publicity for it, you can also be a sponsor!
You can see all the details on the website at:
http://www.donationsfordiabetes.org/p/sponsor.html

Thank you!

Saturday, December 4, 2010

Little Leaves Wreath

I saw a wreath just like this HERE and love it so much I just had to try one!
I cut a circle that was 3 7/8" out of Always Artichoke card stock and then cut the inner circle out at 2 7/8". I used the Little Leaves Sizzlet (about 20 of them) in Old Olive cardstock and randomly glued them on to make the wreath.
For the rhinestones, my fellow SU Demo, Tonya Ditzler, told me that if you use a permanent marker on them you can make them any color you want! It works great! All I did was color them with a red sharpie.


Friday, December 3, 2010

A HUGE Thank You!

Blogs By Heather

I want to give an enormous thank you to Heather Wright-Porto from Blogs by Heather. If you have not been to her site and you currently have a blog or are planning one you should definitely check her out. She does great blog design, setup and maintenance and is great to work with!
My husband and I have started a non-profit organization, Donations for Diabetes, to raise money for diabetes research. I got so inspired from you guys with all of your support and well wishes after doing the Diabetes Purse tutorial that I wanted to do even more. (For those of you who do not know, my five year old daughter has recently been diagnosed with Type 1 diabetes.) We are doing a ski event this winter but I am still finalizing the website and the details so I will have more about it coming soon.
I just wanted to take the time to say a proper thank you to Heather while she is doing all this work for me. She has generously donated all of her time and expertise to help me set up the site for the charity organization and the event and it is looking so good! I need thank her mostly for putting up with me through the design process of this site. I am incredibly detail oriented and very picky!
I will post all the event details and the link to the new website when it is all set up!
Thanks again Heather, you are the best! I appreciate everything you have done more then you could possibly know.

Thursday, December 2, 2010

Happy Birthday Mommo!


All the tags in the pockets...


The cake out...


A close up of the cake.

Happy Birthday to you,
Happy Birthday to Mommo,
Happy Birthday to you!
Today is my mothers birthday and this is the card I made her. Since I am not very good at doing things on time I have not sent it out yet, so Mommo, here is your card! I love you! Happy 43rd birthday! (Don't worry, not really, she didn't have me when she was 13.)
This card uses the Birthday Bakery Stamp set and I made it with two pockets on the front instead of opening up. This would also be great to give a gift card in one of the pockets.
My kids have the cutest song they sing that made me think of this card. It goes:
Wake me, Shake me,
Don't let me sleep too late.
I'm gonna get up in the morning,
And eat my chocolate cake!

Here are the dimensions for the cake and card:
I used the Modern Label punch for the filling. It is shown here in Cherry Cobbler paper but in the end I went with Very Vanilla. I just hand cut the waves using the center bump for the size.


The cake base is 3" x 1 7/8" out of Early Espresso card stock and I used the Owl Punch for the cherries out of Cherry Cobbler. I cut the base by hand.


The card base is 4 1/4" x 5 1/2" out of Early Espresso. The bottom pocket is 1 1/2" x 4" and the middle pocket is 3" x 4". I just used a small bead of Tombow adhesive around the edges and bottom to keep the pockets on and open on the top. The back Vanilla paper is 4" x 5 1/4" and is fully taped on.


I used the small and large tag punch for the tag and Real red ribbon for the ties. I punched the holes with the Crop-a-dile.
Love you Mommo!

Wednesday, December 1, 2010

More Specials! 20% Off Bundles!

Stampin' Up has been having so many great holiday sales and specials I think I somehow missed this one!
You get 20% off of these great bundles!

Click on the flyer below to see it full size!

Here are all of the bundle options.
Click on the image to see it full size.

Tuesday, November 30, 2010

Last Day - Don't Miss Out!

Today is the last day
to get the great deal on joining for half price!!

You do not want to miss this!

Also keep reading below, the FREE shipping and 50% off sale ends today also!


You do not want to miss this deal!
Through November 30, 2010 you can purchase the Standard or Digital+ Starter Kits for only $87.50--that is 50% off the regular price of $175 for over $310 worth of paper or digital crafting and business supplies!
Both the Standard Starter Kit and the Digital+ Kit are available at 50% off the regular kit. These are full starter kits, not mini or reduced-content kits.
If you have been thinking of joining, now is the time! You can find out more details by

CLICKING HERE!

Join my team and have fun stamping and earning FREE merchandise with me! If you do not want to make this into a business you can join for this great price and just get great discounts on what you and your friends buy!

On top of all that the first order you place after you become a demonstrator you will get a minimum 30% discount on everything with the chance to be even higher!

If you are interested in taking advantage of this great opportunity you can log right onto my site

http://lynnpratt.stampinup.net

and sign up.
Click on the "Start your own business" tab and then click "Join Now"
.

My password to join under me is pratt24

If you have anymore questions don't hesitate to contact me through my blog or email me at pratt.lynn@gmail.com

I really hope you decide to join my team! We have a lot of fun!

Last Day for FREE shipping and 50% off Sale!

You don't want to miss this great sale on tons of items as well as FREE shipping on orders of $150 or more!

CLICK HERE
to see the full list!
It's big!

You can contact me to place your order or you can order online anytime!

Go to my Demonstrator Site and click "products" and then "shop now"!

http://www.stampinup.net/esuite/home/lynnpratt/#

Lovie Birthday Mooses

Here are my Owl Punch Mooses. I made a girl and boy around the heart because it is my in-laws birthdays today. (They were born on the same day and have been together since they were kids!)

Here is how I made them!

I punched an owl out using the Owl Punch and Chocolate chip card stock. I drew the lines on with a pencil (shown in the middle) and cut them out with a scissors.


I used the scallop circle punch in Crumb Cake card stock and then used the large oval punch to punch out the antler shape.


I used the 3/4" circle punch for the feet. The Chocolate chip is the base and the crumb cake is out of the scallop circle and then the 3/4" circle punch for the hoof part.


The heart is cut by hand out of Cherry Cobbler card stock and the love is stamped in white craft ink from the Things I Love stamp set. It is then punched out with the large oval punch and then the scalloped oval punch in white. The bow for the girl is using the heart and small circle from the Owl Punch.
Hope you like them!

These are similar to my old Christmas Moose just using the new punch!

Monday, November 29, 2010

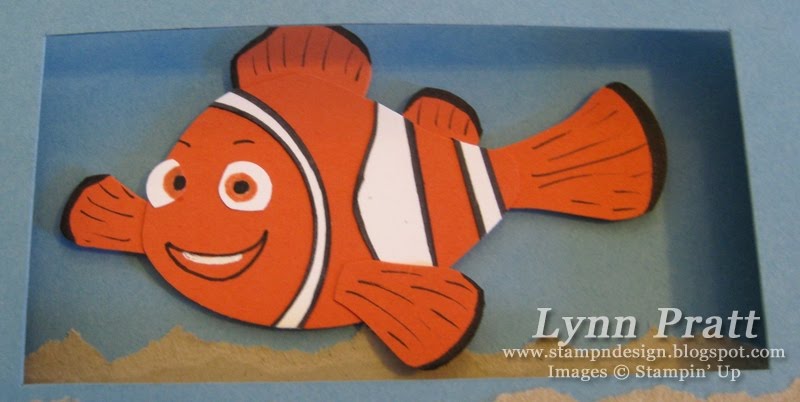
Punch Art Nemo Diorama Card - FREE Tutorial

I did this punch art Nemo project for Christiane Boyer, one of my blog followers who always does my projects and sends me great pictures of how she adapts them and makes them even better!
Here you go Christiane! Its more like punch and cut art instead of just punches but Nemo was a tough shape not to have to cut a little. Hope this is what you were looking for!

Click on the title below to get the FREE printable tutorial!
(You do not have to be on facebook to get this, just make a user name and password to print it. If anyone knows a better file sharing site that you don't have to do this for, let me know!)

Punch Art Nemo Diorama Card Mini Tutorial

Sunday, November 28, 2010

Only TWO Days Left!

There are only two days left to get the great deal on joining for half price!!
You do not want to miss this!

Also keep reading below, the FREE shipping and 50% off sale ends in two days also!


You do not want to miss this deal!
Through November 30, 2010 you can purchase the Standard or Digital+ Starter Kits for only $87.50--that is 50% off the regular price of $175 for over $310 worth of paper or digital crafting and business supplies!
Both the Standard Starter Kit and the Digital+ Kit are available at 50% off the regular kit. These are full starter kits, not mini or reduced-content kits.
If you have been thinking of joining, now is the time! You can find out more details by

CLICKING HERE!

Join my team and have fun stamping and earning FREE merchandise with me! If you do not want to make this into a business you can join for this great price and just get great discounts on what you and your friends buy!

On top of all that the first order you place after you become a demonstrator you will get a minimum 30% discount on everything with the chance to be even higher!

If you are interested in taking advantage of this great opportunity you can log right onto my site

http://lynnpratt.stampinup.net

and sign up.
Click on the "Start your own business" tab and then click "Join Now"
.

My password to join under me is pratt24

If you have anymore questions don't hesitate to contact me through my blog or email me at pratt.lynn@gmail.com

I really hope you decide to join my team! We have a lot of fun!

And only two days left for the FREE shipping and 50% off Sale!

You don't want to miss this great sale on tons of items as well as FREE shipping on orders of $150 or more!

CLICK HERE
to see the full list!
It's big!

You can contact me to place your order or you can order online anytime!

Go to my Demonstrator Site and click "products" and then "shop now"!

http://www.stampinup.net/esuite/home/lynnpratt/#

Saturday, November 27, 2010

And... Still More Block Backgrounds

Ok... so you are probably sick of these acrylic block background cards but I am having some fun with them. For this one I used the edges of the ink pad to make the lines on the block before I stamped it. I thought it gave it a little bit of a different look.
I used the Just Believe stamp set for this with the large block and Crumb Cake ink. I used the Modern Label Punch and the Word Window Punch for the sentiment with Elegant Eggplant and Very Vanilla card stock.
Here is a close up of the grass. I stamped it twice and cut it out and popped it up.
CLICK HERE to see how to do this technique.

Friday, November 26, 2010

Still More Block Backgrounds

I have been having fun with these block backgrounds. I used Soft Suede ink on the block and stamped it heavier on the edges to make it darker. The Eiffel Tower from the Artistic Etchings stamp set is stamped in Early Espresso ink and cut out and popped up with Dimensionals.
I love ripped paper. It is so easy to do and looks so nice!
You can see how I did this technique HERE.

Here is a close up:

Thursday, November 25, 2010

More Acrylic Block Backgrounds

Here is another card using the acrylic block as the background. This one is almost the same as the last card that I did. I just used a larger block on this one and sprayed it with alcohol after I put the ink on the block, then stamped it onto the paper. It gives it a softer look but it's kind of hard to tell in the photo.
CLICK HERE to see the other card!

Acrylic Block Background

So... someone was really using their head for this technique. I love when people come up with great ideas like this!
All you need to do is take your acrylic block (for your clear mount stamps) and stamp it into your ink pad and then press it onto paper. What a great background!
You can see the tutorial on Splitcoast HERE but it's pretty easy to do! When I did not spray the water on the block like the tutorial said to do I got a darker background.
This was the card that I did as the shoebox swap for the last GMS meeting.
I used the Peaceful Season stamp set with Crumb Cake, Cherry Cobbler and Very Vanilla Paper. I used Crumb Cake ink to stamp the block and Garden Green for the holly leaves.
Happy Thanksgiving Everyone!

Tuesday, November 23, 2010

GMS Shoebox Swap

Here are some of the cards that we did at my last Green Mountain Stampers Meeting. We decided to do a shoebox swap instead of the traditional meeting and it was great! This is a great group to be a part of even if you are far away. You can participate in all of our swaps and activities long distance! And this month with the half price joining fee it is the perfect time!

To see more details CLICK HERE!

This bag is by Pam Tatko
This was a swap by Pam Tatko
This card is by Carmen Jochum
This is by Shanti McKenna
This is by Marti Jurnak
Thanks girls! Sorry about the horrible picture quality, I am away from home doing this!

Monday, November 22, 2010

Decorative Label Punch Purse - FREE Tutorial!

Here is my Decorative Label Punch Purse! I figured if you can do it with the Top Note die, why not a mini version of it with the punch! It is the perfect size to hold business cards too!

Click on the title below to get the FREE printable tutorial!

Decorative Label Punch Purse Mini Tutorial


Here is my big version of the purse using the Top Note die that I did forever ago!
Click on the picture to go to the post.
http://stampndesign.blogspot.com/2009/12/top-note-purse.html

And here is another version made out of fabric!
Click on the picture to go to the post.
http://stampndesignstore.blogspot.com/2010/03/my-new-top-note-rag-purse.html
Related Posts with Thumbnails