Click on HOME to see most recent posts!

Place a Stampin' Up order with me and get a
FREE TUTORIAL OF YOUR CHOICE for every $50 that you spend!

Saturday, November 12, 2011

VW Bug - Bad Day Card

I was playing around on Splitcoast (and not doing was I was supposed to be working on) and found THIS CARD! It seemed like too much fun to not make a template for this card. This is totally my kind of humor. Since it amused me so much, I made the template FREE!

The main card base is Baja Breeze, and then I cut a top layer out of Real Red card stock for the front with the windshield cut out, and a second layer for the front hood. I sponged it with Cherry Cobbler ink.
The lights are a 3/4" Circles punched out of Silver and a 1/2" Circle out of So Saffron. I used the Under the Stars stamp set for the mosquito that hit the front windshield, and I used the Perfect Words Hostess stamp set for the license plate. The mirrors are using the Word Window Punch.
This is what the inside says:

Here is the car just plain, you can make it into any type of card!

Click on the image below to download the
FREE Template!

The dashed lines are where the card is folded at the top.

Thursday, November 10, 2011

Candy Wrapper Box - Turkey

I know my projects have skipped ahead to Christmas already, but don't worry, I still have some great Thanksgiving stuff too!
I saw these great little Candy Wrapper die boxes HERE and just had to make Linksome of my own! I thought a turkey would be perfect and of course I had to use the Spice Cake DSP from the Holiday Mini because I am totally obsessed with it.
Here is how I made this little box! I think I may have to have Thanksgiving at my house this year just so I can make these for each spot at the table. How cute would these be filled with little treats and holding names as place cards!?
Here is how I made them!

Cut out two Candy Wrapper Die pieces using the Big Shot. I did the body out of Soft Suede card stock. You are going to cut the end section off of both pieces. Put glue on the small tab on the side and stick them together. Then put glue on the other side tab and make the little box.


Once they are together, you can cut between the tabs on one side only. Fold them in and glue them together to form the bottom of your box.


Fold in the top pieces and put a ribbon though going in and out every square hole.


I used the 2-1/2" Circle Punch with Spice Cake DSP to make the turkey feathers. Arrange them like this on your paper and then put on glue and stick them on. I found this easier then putting them on one at a time.


The eyes are using the 3/4" and 1/2" circle punches and the mouth and red gobble are cut freehand using More Mustard and Cherry Cobbler card stock.

Owl Punch Pear Card

Here is my Owl Punch Pear card! It was really simple to do but I will break down what I used.
I used the Owl Punch with Wild Wasabi card stock to make the shape for the pear. I cut off the feet and the ears. For the inner one (Very Vanilla), I just cut the feet and ears off and then cut a little bit off around the edges of the shape to make it smaller. The center white is the 1/2" Circle cut in half and the seeds are Chocolate Chip using the Cupcake Punch, its the flame from the candle! The stems are using the bird punch. Just cut a branch in Chocolate Chip and other in Wasabi, cut the leaves off and glue the Wasabi ones on. Then just cut the top leaf in the shape of a stem. The words are using the Billboard strip with the Big Shot. (I love these alphabet strip dies, they come in so handy all the time!)
My husband was not a fan on my wording for this, and thought it should say, "What a Pear!" or something like that. But of course he mentioned this after I had glued them on! Usually I ask his opinion before I glue it together... oh well!
I thought this would make a cute anniversary or wedding card.

I used the the Scallop Trim Border and Corner Punches for the fancy rectangle the pears are on. Then I just used the Simply Scored to emboss the line going around it. You can get the dimensions for using the Scallop Trim Border and Corner Punches HERE to make them line up perfectly.

Tuesday, November 8, 2011

Slice O' Pumpkin Pie Box - FREE Template!


I wanted to make one of the cake/pie shaped boxes that you see all the time, so I decided to look for a template. I wasted so much time searching for a template that I liked, I gave up and decided to make my own! I saw a pumpkin pie in a food magazine and wanted to make one like it. I thought these would be so great as place settings or to put out for treats for Thanksgiving or Christmas.
My little box looked so yummy I made a real pumpkin pie for dessert tonight too!

Here is how you make your box:
For the pumpkin pie I used More Mustard card stock and ink. I cut the pie box shape out using the template and scored on the dashed lines. Before you put it together, you might want to sponge the edges, it makes it easier then doing it once its together. Put Tombow adhesive or sticky strip tape on the two tabs attached to the long rectangle section (on left). Glue these to the end triangle piece to form the main box. Do not glue the back, that will be how you get your treats in and out.


For the "crust" I used Soft Suede card stock and sponged the edges with River Rock ink (the suede ink makes it very dark). My piece was 2-3/4" x 3-1/4" and I scored it at 2". I then used the Scallop Edge punch on the top to make the crust more fun. The side edges (crust) of the pie I cut freehand using the template as a guide for size.


And you can't have pie without that nice dollop of whipped cream on the top, right?!

Here is how to make the whipped cream:
Cut out the flower looking shape using the template. Fold over four of the tabs, making sure you are leaving the larger tab(of the two ends of one tab/petal) on the top like shown on right.


Fold over the next tab, but tuck under the small petal on that tab. Then do the same to the last so they all tuck under each other.


Click on the template image below to download the FREE template!

If you make a different kind of pie, send me a photo! I would love to see them!

Monday, November 7, 2011

Exploding Triangle Gift Box


I found this great little box and traced it back through blog land to the creator (I think!). The directions are on the With a Stamp and a Song blog and I love it!
I did make my own directions with pictures because I made my box larger because the other size seemed too small for me. I used the
25 & Counting stamp set and the Northern Frost Decorative Strip with the Bog Shot for the snowflakes.
I thought these would make the greatest Advent calendar gift boxes! You could use the 25 & Counting stamp set and make different little boxes for each day!
I have a feeling my kids are going to get spoiled this December...


See all of the details below!

Here is how you will fold your paper. The one that I saw uses a 6" square piece of paper but I found that made the boxes too small for my taste, and my gifts!
I used an 8-1/4" square piece of paper. With this you will score at 2-3/4" and 5-1/2" in both directions, then put the diagonal scores on.

Here is what your paper will look like once its scored and folded, I used Night of Navy. You will cut a 2-3/4" x 5-1/2" piece and score it down the middle. You attach this to one of the flat center pieces on your scored piece. This is the flap that keeps your box closed. (I changed my blue to white before I glued it on. The layer in Night of Navy is 2-1/2" x 5-1/2" folded in half that I layered on top of my white.)


You will fold like shown below to make the sides go together to make the box. You have to fiddle with it a bit to get them to match up and close. (No top flap on in this photo)


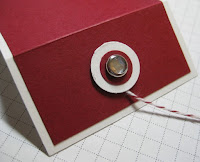
After doing this blue one, I had to use Velcro dots to keep it closed, so I changed around the top flap to keep itself closed. I used the 3/4" Circle punch in white and the 1/2" Circle punch in Cobbler. I put a dimensional on the back and punched a hole with the small hole on the Crop-a-dile and put through a Rhinestone brad. I used a few inches of the Cobbler Bakers twine and stuck it to the Dimensional. Do the same thing to the second one, only don't stick the twine in.


I made the top flap on this one 2-3/4" x 4-1/8" (in white) and scored it at 2-3/4. (The cobbler layer over it is 2-1/2" x 3-7/8" and scored at 2-5/8".) I put the circles in the top and bottom half of the front so all you have to do is wind the twine through them in a figure eight style and it keeps the top closed.


Simple and easy to close!


Hope you liked my version of this great little box!

Sunday, November 6, 2011

Santa Two Cupcake Box

I loved my Santa Wine Bottle Basket so much, I had just had to make my Two Cupcake Box dressed up as Santa too! I used the new Red Glimmer Paper to make this, and it is so gorgeous and sparkly. The pictures really do it no justice at all. I love this paper!
I used ribbon for the black belts and the large Scallop Circle punch for the tag with the 1-3/4" Circle Punched in the Red Glimmer Paper in the center. The belt buckles are made out of Gold card stock but it would be great out of the Silver Glimmer Paper too! The bottom white border I did with the Tasteful Trim die with the Big Shot and just trimmed some off of the bottom. You will want to use the Red sticky strip tape to put this glimmer paper together, I found nothing else really holds it in place.

CLICK HERE
to get the tutorial to make this box!
Here are some other projects that I have done with this box!
Click on the images to see the posts.
Link
Related Posts with Thumbnails