
Click on HOME to see most recent posts!

Place a Stampin' Up order with me and get a
FREE TUTORIAL OF YOUR CHOICE for every $50 that you spend!

Wednesday, November 30, 2011

Mini Honeycomb Ornaments

I usually try to only do one post per day, so I don't run out of things to post... but with Christmas in less then a month, I think I have more project ideas then days!
So keep checking back often, I am on an ornament kick right now, so there might be multiple posts per day!
I have to send a thank you out to Ellen Williams for this great idea. After seeing the large Honeycomb Ornament that I posted this morning, she emailed me and suggested doing it with the ornament punch. I thought it would be too small, but I tried it and they came out so cute! You do have to put less glue dots on them, so you can see what I did below.

Tips for making these:

1. You can cut your 12" paper into 3-3/8" x 12" strips and punch both sides to get the most punched ornaments out of your DSP.
2. You can stack two punched shapes on top of each other and score them on the Simply Scored at the same time!
3. You want to make these out of DSP, not card stock. Card stock would be too thick I think, and you need the paper to bend.
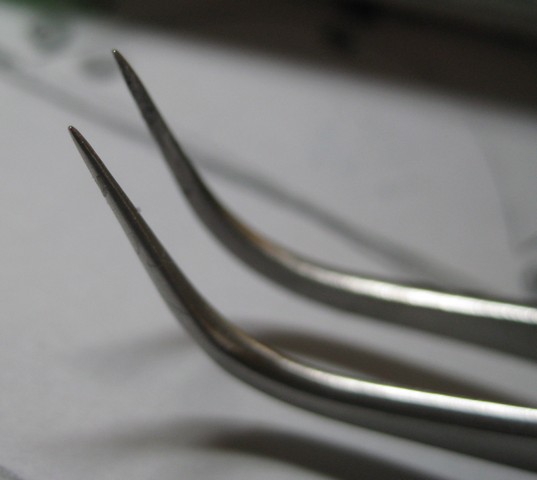
4. Get a very sharp ended tweezers to put the glue dots on. It picks them up so easily and puts them down without sticking to the tweezers. You can get these in the beauty isle near makeup stuff. It is worth the investment in a good sharp pair instead of the dull $2 version.
5. Use Dotto removable adhesive to put your first folded shape down on your scrap paper, this makes them stay still and easier to stack.

And here is how I made these:
(Check my Honeycomb Ornament post for the rest of the directions for the larger size.)

For the first picture above, here is how I did the glue dots. I made this one simple and only did two spots. This was really easy and quick to do. I would suggest doing it this way if you are doing lots of them, or doing this with a group.
Once you put the one glue dot down, fold over the ornament and put the dot in the other spot and put the next one on top. I labeled my diagram with the colors of my DSP paper sides so I would not get confused. I did 13 of these shapes for this one.


Here is how I did the second one. One side has the two at either end, and the next side has it in the middle. Once you get this one together, you really have to manually bend the papers to get them to open up and it kind of folds them instead of just bending. Kind of a pain, so I would suggest the first way unless you have a lot more patience then me! I did 10 of these shapes for this one.


Hope you have fun with these, they are perfect for little trees!
They also fit perfectly in my 6 Pack Ornament Holder and make a great gift!

Honeycomb Ornament - FREE Template!


I saw the tutorial to make this ornament on Splitcoast and I just had to try it. I do not have the die they used, so I made a template for a similar shape.

You can get the FREE template and see the directions below!

I have listed the things I did that were different from the tutorial on Splitcoast, but you will need to check out the original tutorial for the full directions because I do not have pictures of each step. It is the Honeycomb Ornament Tutorial.

Each one of these shapes can be cut out of a 4" square of paper, so you get 9 out of one 12" sheet, and you need 18 cut shapes to make one ornament. So two pieces of DSP.


Once you have all of your shapes cut out, fold them all in half. Mark up the template like shown below for where you want to put your glue dots. I used hot glue to keep mine together, instead of a ton of glue dots and it worked pretty good.


This was a lot of work to do, but this ornament is gorgeous! When it spins and moves it really looks beautiful. I used the 1/8" Real Red ribbon going down the center and the old Pretties Kit beads for the bottom.


Click on the template image below to download the FREE template!


Last Day for the Extravaganza!

Don't miss out! Today is the last day!
Up to 60% off select merchandise!
You can see more details or place an order on my Stampin' Up site:
http://lynnpratt.stampinup.net
Click on Promotions on the bottom of the page.


Don't forget, for every $50 in merchandise you purchase, you get one free tutorial of your choice! Spend over $150, you get hostess benefits too!

Tuesday, November 29, 2011

Lattice Die Tree Ornament


Here is my Christmas Ornament that I made using the Lattice Die with the Big Shot. This came out so gorgeous, the pictures really do not do it justice.
You can see how I made it below!

Cut out six Lattice shapes using Whisper White card stock and the Big Shot. You can cut out more, and I bet that would look even better. Fold each lattice shape in half like shown.


Once they are all folded in half, glue each half to the next one so you have a stack of lattice shapes, folded in half, stacked up. Then just take the two ends and glue them together.
I did use Cherry Cobbler seam binding ribbon down the center to make the hanging part, but that was the most difficult part of getting it together. I would suggest just attaching the hanging string at the top or using really thin ribbon to go down the center. Once you have that in, then you glue the last sides together. I used the Two-way glue pen for this and it worked great. I also used the retired Pretties Kit for the beads that I hung at the bottom, but you could use any beads.

Thursday, November 24, 2011

Happy Thanksgiving!

Happy Thanksgiving!
I made this little guy with the Owl Punch and the Top Note Die with the Big Shot.

Monday, November 21, 2011

Online Extravaganza Sale!!

This sale goes from November 21-30 only! Don't miss out!
Up to 60% off select merchandise!
You can see more details or place an order on my Stampin' Up site:
http://lynnpratt.stampinup.net
Click on Promotions on the bottom of the page.

Thursday, November 17, 2011

Lego - Duplo Birthday Card


The kids got invited to a Lego Birthday party and I just had to make a card just for it! I saw THIS ONE on Splitcoast and loved it so much that I had to make it my own.
I have included all the details and measurements below on how I did it!


For the little top bumps on the Lego, I used the Word Window Punch cut in half. I used the Sahara Sand marker for the shading with the White Gel pen for highlights. To line this up evenly I used my SU Grid paper. Each square is 1/4". My top Daffodil Delight piece is 3-1/8" across x 2-1/2" folded in half.


The white insert is 2-1/4" x 2-1/2" and you just stick it on the inside of the top folded yellow piece and tape it closed.


The card base is 5" x 3-1/8" out of Pacific Point folded in half. I used Red sticky tape on the edges to keep it together. The red block on top is 1-1/4" x 3-1/8" with the bumps done the same way as the yellow ones. Stick this right on the front of the blue pouch.


I stamped with the Happiest Birthday Wishes Hostess stamp set in Pacific Point ink, and your card is ready to go together! Just like the Lego's!


For the Lego on the envelope I made it 3-1/8" x 1-1/2". The circles are from the large circle on the Owl Punch. I sponged the edges and added highlights with the gel pen. The name is from the Billboard strip die cut using the Big Shot.

My kids LOVE this card and so did Brett!
Here is Timmy playing with the Legos at the party and the Brett blowing out the Lego candles on the Lego cake! This was such a great theme for a party! This card would be perfect for invitations to your own!


Monday, November 14, 2011

Diabetes Donation Purse Tutorial

I know many of you have seen this purse before and made a donation, thank you so much to all of you!
For those of you that have never seen this, I made this project in honor of my daughter Ashley. My six year old daughter, Ashley, was diagnosed with Type 1 diabetes last year. She is an amazing kid and continues to impress us with her great attitude towards this disease, and she is doing great!

ALL proceeds from this project will now go towards JDRF in Ashleys' name through our ski event!
We are having our second annual Downhill for Diabetes ski/snowboard event on Sunday, February 26th 2012! It will be held at Pico Mountain Resort in Vermont.
All donations will go towards this event and will be donated to JDRF(Juvenile Diabetes Research Foundation).

The purses are approximately 7" across x 4 1/2" tall x 4" deep. They will easily fit many cards and envelopes inside and would be great to hold swaps!

I thank all of you who make a donation from the bottom of my heart. You are welcome to make a donation to this great cause even if you do not want the tutorial. So many people suffer from this disease and every penny donated gets them that much closer to finding a better way to handle the disease and hopefully find a future cure!
Thank you.

CLICK HERE
to see more details or to make a donation and get the tutorial!


I would also welcome anyone else who has a blog or website, to post the photo of these purses and a link to raise more money for this great cause.
The more people that see this and are able to donate the better!
If any of your live close enough, we would love to have you join us for the ski event too!

Saturday, November 12, 2011

VW Bug - Bad Day Card

I was playing around on Splitcoast (and not doing was I was supposed to be working on) and found THIS CARD! It seemed like too much fun to not make a template for this card. This is totally my kind of humor. Since it amused me so much, I made the template FREE!

The main card base is Baja Breeze, and then I cut a top layer out of Real Red card stock for the front with the windshield cut out, and a second layer for the front hood. I sponged it with Cherry Cobbler ink.
The lights are a 3/4" Circles punched out of Silver and a 1/2" Circle out of So Saffron. I used the Under the Stars stamp set for the mosquito that hit the front windshield, and I used the Perfect Words Hostess stamp set for the license plate. The mirrors are using the Word Window Punch.
This is what the inside says:

Here is the car just plain, you can make it into any type of card!

Click on the image below to download the
FREE Template!

The dashed lines are where the card is folded at the top.

Thursday, November 10, 2011

Candy Wrapper Box - Turkey

I know my projects have skipped ahead to Christmas already, but don't worry, I still have some great Thanksgiving stuff too!
I saw these great little Candy Wrapper die boxes HERE and just had to make Linksome of my own! I thought a turkey would be perfect and of course I had to use the Spice Cake DSP from the Holiday Mini because I am totally obsessed with it.
Here is how I made this little box! I think I may have to have Thanksgiving at my house this year just so I can make these for each spot at the table. How cute would these be filled with little treats and holding names as place cards!?
Here is how I made them!

Cut out two Candy Wrapper Die pieces using the Big Shot. I did the body out of Soft Suede card stock. You are going to cut the end section off of both pieces. Put glue on the small tab on the side and stick them together. Then put glue on the other side tab and make the little box.


Once they are together, you can cut between the tabs on one side only. Fold them in and glue them together to form the bottom of your box.


Fold in the top pieces and put a ribbon though going in and out every square hole.


I used the 2-1/2" Circle Punch with Spice Cake DSP to make the turkey feathers. Arrange them like this on your paper and then put on glue and stick them on. I found this easier then putting them on one at a time.


The eyes are using the 3/4" and 1/2" circle punches and the mouth and red gobble are cut freehand using More Mustard and Cherry Cobbler card stock.
Related Posts with Thumbnails

