

 I usually try to only do one post per day, so I don't run out of things to post... but with Christmas in less then a month, I think I have more project ideas then days!
So keep checking back often, I am on an ornament kick right now, so there might be multiple posts per day!
I have to send a thank you out to Ellen Williams for this great idea. After seeing the large Honeycomb Ornament that I posted this morning, she emailed me and suggested doing it with the ornament punch. I thought it would be too small, but I tried it and they came out so cute! You do have to put less glue dots on them, so you can see what I did below.
Tips for making these:

1. You can cut your 12" paper into 3-3/8" x 12" strips and punch both sides to get the most punched ornaments out of your DSP.
2. You can stack two punched shapes on top of each other and score them on the Simply Scored at the same time!
3. You want to make these out of DSP, not card stock. Card stock would be too thick I think, and you need the paper to bend.
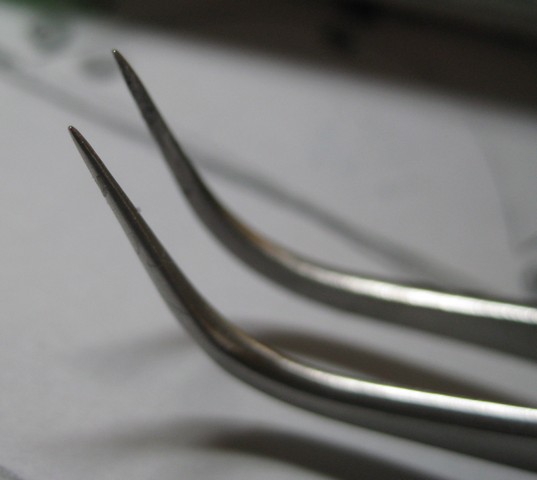
4. Get a very sharp ended tweezers to put the glue dots on. It picks them up so easily and puts them down without sticking to the tweezers. You can get these in the beauty isle near makeup stuff. It is worth the investment in a good sharp pair instead of the dull $2 version.
5. Use Dotto removable adhesive to put your first folded shape down on your scrap paper, this makes them stay still and easier to stack.
And here is how I made these:
For the first picture above, here is how I did the glue dots. I made this one simple and only did two spots. This was really easy and quick to do. I would suggest doing it this way if you are doing lots of them, or doing this with a group.
Once you put the one glue dot down, fold over the ornament and put the dot in the other spot and put the next one on top. I labeled my diagram with the colors of my DSP paper sides so I would not get confused. I did 13 of these shapes for this one.
Once you put the one glue dot down, fold over the ornament and put the dot in the other spot and put the next one on top. I labeled my diagram with the colors of my DSP paper sides so I would not get confused. I did 13 of these shapes for this one.


Here is how I did the second one. One side has the two at either end, and the next side has it in the middle. Once you get this one together, you really have to manually bend the papers to get them to open up and it kind of folds them instead of just bending. Kind of a pain, so I would suggest the first way unless you have a lot more patience then me! I did 10 of these shapes for this one.

Hope you have fun with these, they are perfect for little trees!
They also fit perfectly in my 6 Pack Ornament Holder and make a great gift!

They also fit perfectly in my 6 Pack Ornament Holder and make a great gift!


 ABC Book
 3 Card w/ Box
 Jar Gift Set
 Pocket Glider Card
 Tri-fold Wedding
 Sunhat & Glasses
 Flirtatious Purse
 Swap Garden Bag
 Star Cards/Box
 Fun Frames
 Treasure Box, Card
 Fun Folds Open Sea
 Glider Card
 Nurse Box & Cards
 Race Car Box
 Castle Frame
 Egg Gift Card
 Bug Cards
 Tux card
 Flip Calendar
 Photo CD Album
 Gingerbread Box
 Gift Card Holder
 Fold Scrapbook
 Diabetes Purse
 X-mas Cards
 Haunted House
 Chef Pop-out
 Chef Pop-out
 Owl Cards 2
 Spooky Punches
 Foliage Box+Cards
 Owl Purse +Cards
 Bus, Fire, Police
 Briefcase & Cards
 Cylinder Purse
 AE 3 Cards
 Pie Box&Card
 Potato Heads
 Castle Album
 Scrapbook Album
 Scrapbook Album
 Purse & Wallet
 Jar Cards
 Animal Cards
 Barn & Cards
 Gardeners Bag
 Picnic Basket
 Cupcake cup
 Chocolate Candy
 Bird in Cage
 Pool Table
 Wheelbarrow
 Bird Cards#2
 Bird Cards
 Jewelry Box
 Clock Game
 Purse & Cards
 Rag Purse
 Teapot and Cards
 Sheep box & cards
 Egg Box & Chicks
 Doctor's Bag
 Pop-out Flower
 Suit Dress Card
 Explosion Box
 Vest Card
 Tackle Box
 Noah's Ark
 Love Coupon
 Pull-out Scrapbook
 Calendar Book
 Card Box
 Cupcake Box
 Photo Box
 Woven Basket
 Six Pack Baby Jars
 Scrapbook
 Scrapbook
 Santa Wine
 Top Note Album
 Top Note Album
 Decorative Candles
 Origami Cube-Box
 Origami Album


