Friday, May 28, 2010

Thank YOU!

I just wanted to thank everyone for the birthday wishes yesterday!
I got a load of free tutorial emails so bear with me while I try to catch up and send them all out! Hope you all enjoy my birthday present to you!

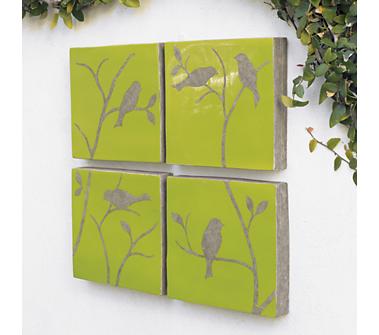
Inspired by the Birds!

I was inspired by the artwork from Crate and Barrel that is below for this card. I used Old Olive and Kraft cardstock. I used the two step bird punch and the other two birds I just cut out of paper as well as the branches. All of the layers are popped up with dimensionals. This is a 5 1/2" square card but I think it would look great big on a wall like the real artwork is!

Thursday, May 27, 2010

I am Blessed

I truly am blessed with the most amazing husband ever. He just had two dozen red roses delivered to the house for my birthday even though I am going to see him in another hour. I am so happy I just thought I would share the cheer!

Today is My Birthday!

Today is my 30th birthday!
I thought it would be fun to give something away for my birthday so anyone who emails me today, before midnight Eastern time, can have one tutorial for free!
Pick which one you want and email me at: prattdesign@gmail.com!

Wednesday, May 26, 2010

Shoe Inspired

A friend of mine started hand crafting these elegant beautiful shoes for women. She makes these totally by hand so each one is a one of a kind item! I was looking on her site and saw this pair that inspired this card. I used the Things I Love stamp set.If you want to check out her website and her other shoe styles
Here designs are great!

Bows Made Easy... Really!

My mother recently showed me the easiest way I have ever seen to tie a bow so I thought I would share it with you!
I used this technique for the bow on this card. This card uses the Asian Artistry hostess stamp set with Very Vanilla and Bordering Blue cardstock. It also uses the vanilla satin ribbon and the wide oval punch.
Here is how to tie your easy bow:

You want to tie a double knot in your string around an object. You first have to make sure that the object is big enough that once the ribbon is tied around it, it will fit the length of your paper that you are using once it is flattened out. I found if I tied the ribbon around the in-color marker box for the 6 markers this was perfect to go around the card the long way. Does this make sense? If your card is smaller, you can tie the ribbon around your Stamp cleaner spray bottle or something else.

Wrap your ribbon around the box and tie your double knot and trim the ends of your ribbon so your bow is how you want it to look on your card.

Then turn the box over and cut the ribbon down the center in the back.

This is what you will have now.

Just center this over your card and use some Snail adhesive to stick the ends under your paper. Now you don't waste all the ribbon to go around the entire back of the paper and you don't have to worry about your knot being too loose or too tight or not centered. So easy!
This is a great technique to show at workshops where people have trouble tying the ribbon around their cards and getting it perfectly centered!

Monday, May 24, 2010

Overalls Link is now Working!


I fixed the link to download the FREE template for the overalls card. Sorry for the wait!
CLICK HERE to get it!
To see the original post, click here.

Sunday, May 23, 2010

Butterfly Punch Pansies Page


I have seen these pansies using the butterfly punch everywhere and I just had to try some of my own. Here is my scrapbook page with them!
We planted a separate garden just so we would have flowers to cut and bring inside since Ashley kept cutting them out of my front garden. I sectioned off a part for the kids with little fences and let them pick out their own flowers at the nursery and plant them. They were so cute doing it and so far everything is still alive!
Here is a great blog that has a video for how to make these flowers!