Saturday, February 20, 2010

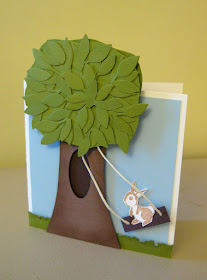
Easter Bunny Tree Swing


I saw a great card like this and just had to make my own version of it!

You can see the original one by CLICKING HERE. Mine is much easier (simpler) and uses only Stampin' Up stuff.
Here is how I made it:

The main base of the card is 4 1/4" x 4 1/4" in white with a 4" x 4" Bashful blue square on it. The tree is cut out of a 2 1/4" a 4 1/4" piece of Close to Cocoa.


I punched the hole out with the small oval punch and put Chocolate chip behind with dimensionals.


The tree top is a 2 1/2" x 3" piece of Old olive cut freehand into a tree shape. I cut two of these.


I used the Little Leaves die cut to make the leaves on the tree and just cut them up and put them on.


The little bunny is from the Forest Friends stamp set on a chocolate chip swing with twine as the rope. I put the first tree top down, then the rope and dimensionals and then the top.


Then I put grass on the bottom! Done!

Thursday, February 18, 2010

The End of the Featured Artist Posts!


Turtles birthday front


Turtles birthday inside


Turtles birthday inside pulled out!


Mother's Day Front


Mother's Day inside


Monkey front


Monkey inside pulled out

I am in Christina Crawford's downline and she chose me to be her featured artist for this month! I have to create about 25 projects focusing on certain stamp sets. I chose all of mine from the Occasions Mini Catalog and they are; Well Scripted, Fox & Friends and Tote-ally Tess. I used other stamp sets with them but these will be in all of the projects.
Here are the rest of the cards for this! To see them all CLICK HERE!

Tin Foil Emboss

I got this stamp set, Three Little Words, FREE for Sale-a-bration. I love free! Somehow that makes me like this stamp set more I think...
Anyway, I used tin foil to emboss with the Finial Press embossing folder. I first taped my tin foil down on cardstock and then put them in the embossing folder together. This made it very easy to attach this to the card without ruining the raised embossing. The colors I used are Night of Navy, White and So Saffron. These colors look really nice with the silver.

Stamp-n-Design into Spring FREE PASS giveaway!

All you have to do is leave a comment here and you will get a chance to win a FREE PASS to my Stamp-n-Design into Spring event!
You can see all the details by CLICKING HERE.
**If you have already signed up for the event and win this free pass I will refund your payment! Don't miss out on the Early bird sign up rate!

Baby Peapod Card

I saw a card like this and just had to make one of my own! I liked it so much I thought I would make a FREE template for you guys!
CLICK HERE to get the FREE TEMPLATE!

This is how I made it:

I cut out all of the template pieces in Old olive cardstock. You also need two 1" circles and two 1 1/4" circles. I stamped with the Bella Toile background stamp with Old Olive ink on all but two if the pieces like shown below. I left the top plain but inked the edges. Only one piece you do nothing to, that will be on the inside.


Put that one plain piece on the top of the pea pod.


With Blush blossom cut out a 1" circle and sponge the edges. I added a freehand cut bow for a baby girl.


Add the top and the leaf part with Tombow glue, just glue the very top so you can open it and see the baby inside. Add on all the peas. I highlighted them with the white gel pen and the old olive marker.


I stamped 'Small wonder' from the Whimsical Words (sale-a-bration) stamp set on whisper white, cut out with the large oval punch. Then old olive with the scallop oval punch. I used rich regal eyelets and twine to hold the tag on. I punched the holes with the crop-o-dile.

You are all finished!


I saw the original card on Splitcoast, CLICK HERE to see it.

Oreo Cookie Card


I saw this OREO card on another blog and just had to make one! I changed mine around a bit. Here is how I did it:

I used the Scallop circle #2 die cut with the big shot. Overlap the folded side of the paper a bit so when you open it, it stays together. I put it through with a texturz plate.


I cut another full scallop circle and cut out the center using my circle cutter. I used my scorer to make the lines like an oreo has.


I cut two white circles and put them on the inside with dimensionals for the white cream center.


I attached the outside scored edge to the front. Then I punched a small oval inside the large oval punch. I put that over a large oval and wrote oreo in the center.


If you want to see the original where I saw it CLICK HERE.

Wednesday, February 17, 2010

February Green Mountain Stampers Meeting

We had another Green Mountain Stamper's meeting this past Saturday under my upline Jennifer Heffernan. We have swaps and demonstrations and some of the ladies bring in samples of their work to share. This is a great group to be a part of!

Here are the three make-n-takes that we did at the meeting.


Here are a few of the swaps that I got.

by Jennifer Heffernan


by Pam Tatko


by Shanti McKenna

Here are some great cards that were made by Trena Bevier.
You can visit her blog HERE!

If anyone is interested in being a Stampin' Up demonstrator in this group and getting to attend these meetings please contact me! You can participate long distance too!

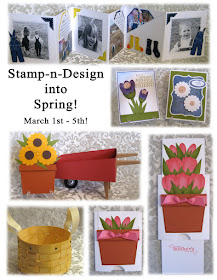
Join my 'Stamp-n-Design into Spring' Online Event!

This will be my first online class event! You don't want to miss it!
Here is a mini preview of the projects!

  • This event will run from Monday March 1st through Friday March 5th. If you are not around on these dates, don't worry! You will have access to the projects until the end of March.
  • The projects include a little bit of everything; scrapbooking, card making and three dimensional projects.
  • Each of the five days there will be a great new Spring themed project posted with full step by step directions, pictures and templates when needed. Multiple options will be given for the projects to make them for Mother's Day, Father's Day, Easter, a new baby or just Spring in general! These will be pdf. files to download so you can use them anytime, not just on that day!
  • I will be giving away prizes at random times throughout the event that you do not want to miss!
  • There will be a chat room open 24/7 so you can talk to anyone else online at the same time. I will also do at least one live chat during the event!
  • If you don't have the exact stamp sets or accessories needed you can just change it around to make it your own. Then you can add your pictures to the public gallery to show others what you have come up with! This is also a great resource for others to see different re-creations of all the projects!
The price of this event will be $24.99.
Click add to cart below to join this great event!

** You can still sign up for this class after the event has started!


Monday, February 15, 2010

Easter Bunny with Carrots


This is the front of the card above and below is the inside!

Here is my little punch art Easter bunny with a garden full of carrots! Sorry I have not posted in so long, I have two sick kids with 103.5 fevers! Hope you like this little guy!
His ears are the small oval with some trimmed for the pink inside.
His body is the scallop oval and the small oval, his legs and eyes are the heart to heart punch and his head is the 1 1/4" circle. His paws are the 1/2" circle. The carrots are the word window punch trimmed down.